Getting Started
COMPATIBILITY NOTE
This version works only with latest version of AngularJS, or at least your version must support components kind of directives.
After purchasing, unzip folder somewhere in your project! path/to/ from below is relative path to unzipped folder.
Run locally
- Open unzipped folder in your favorite editor.
- Open terminal and make sure you're in root folder (where package.json in located).
- Install all dependencies:
npm install // or yarn
- Start application in development mode:
npm start // or yarn start
- Make some channges.
- Build production distribution folder:
npm run build // or yarn build
- Upload dist folder to server.
- Enjoy!
Install within existing application
First include styles in your application:
<link href="path/to/dist/ngjsEmailBuilder.[hash].css" rel="stylesheet">
[hash] is changed everytime, just look in dist folder, there's the right name of css file.
Include module from dist folder directly to you html page:
<script defer type="text/javascript" src="path/to/dist/ngjsEmailBuilder.b.js"></script>
Or import it in your app module:
import 'path/to/dist/ngjsEmailBuilder.b.js';
Of course you're able to include it from "development" folder, but in this case, make sure that you have all webpack plugins to handle css and html files. Development files are located in path/to/app/builder, so include it from there:
import 'path/to/app/builder';
TIP
If you include it from "development" folder, remove the link element for styles. Your bundle module has to handle all styles automatically.
After including, inject our module ngjs-email-builder-module to main app:
angular.module('yourMainApp', ['ngjs-email-builder-module']);
And include ngjs-email-builder component somewhere in your html page:
<ngjs-email-builder style="..."></ngjs-email-builder>
Now you must see an Email Builder ready to use, change style attribute in order to make stylizationm such as height, width or any other CSS Styles. There's no limitations, change it like a simple HTML Element - add classes, attributes as you want!
WARNING
There's just one defined attribute, which is email="...", it's used to send already saved email or send some custom data! More info about, find below in this page.
Dependencies
Like many good applications, without dependencies - is unlikely to create some good ones! So please make sure that you have all listed dependencies included in your application:
- Angular Sanitize@1.7.2
- Tinymce@4.8.3
- Angular UI Tinymce@0.0.19
- Angular Translate@2.18.1
  <script defer src="https://cdnjs.cloudflare.com/ajax/libs/angular.js/1.7.2/angular-sanitize.min.js"></script>
  <script defer src="https://cdnjs.cloudflare.com/ajax/libs/tinymce/4.8.3/tinymce.min.js"></script>
  <script defer src="https://cdnjs.cloudflare.com/ajax/libs/angular-ui-tinymce/0.0.19/tinymce.min.js"></script>
  <script defer src="https://cdnjs.cloudflare.com/ajax/libs/angular-translate/2.18.1/angular-translate.min.js"></script>
If you don't want to include directly to your page, look at another solution by editing webpack options. But be aware, the second solultion may well increase bundle size, so we strongly recommend inlcuding dependencies like above.
WARNING
Be careful to include ngjsEmailBuilder.b.js after all these dependencies!
Inject saved email
If you have already a saved email (created with this builder), inject it in ngjs-email-builder component through email attribute, like this:
<ngjs-email-builder email="{ saved email object here }"></ngjs-email-builder>
Example
Here's our module, with a defined email:
module('yourMainApp', ['ngjs-email-builder-module'])
  .controller('mainCtrl', [
    class MainCtrl {
      constructor() {
        this.email = {
          newEmailName: 'My new email template',
          emailOptions: { ... },
          elements: [ ... ]
        };
      }
    }
  ])
And this is html:
<div ng-controller="mainCtrl as main">
  <ngjs-email-builder email="main.email"></ngjs-email-builder>
</div>
Custom data
You can send some custom data to email attribute as well:
module('yourMainApp', ['ngjs-email-builder-module'])
  .controller('mainCtrl', [
    class MainCtrl {
      constructor() {
        this.email = {
          id: 1,
          newEmailName: 'My new email template',
          emailOptions: { ... },
          elements: [ ... ]
        };
      }
    }
  ])
Later, on save event, you'll be able to get this email with this id!
ngjs.on('save', ({ email, html }) => {
  console.log(email); // this contains your id as well, get it like this: email.id
  console.log(html); // this is ready-to-use html template
});
Get more info about events here.
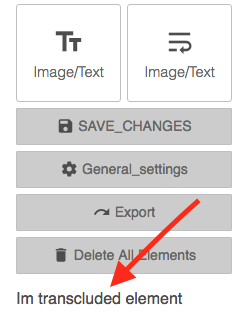
Transclude
If you try to include some HTML inside of ngjs-email-builder component, it'll be transcluded after buttons from left side!
<ngjs-email-builder email="..." style="...">
  <p>Im transcluded element</p>
</ngjs-email-builder>
And here will be your content:
MJML
Unfortunatelly, there's just one way to generate HTML output for now, and this is through MJML API, but there're some limitations, like:
- Old MJML Version.
- Sometimes it takes too long to get a response.
- There's no way to send additional options, like beautiful output, remove comments and others.
Right now, we're in process to build another API to cover all these limitations, till then don't forget to set mjmlPublicKey and mjmlApplicationId options to NGJS Service in order to generate ready-to-use HTML.